Making the switch from a three-pin RGB connection to a four-pin header can seem confusing at first, but it can be a breeze with the proper guidance. This tutorial will show you how to make the switch and highlight some benefits. So if you’re ready to breathe new life into your old tech, keep reading!
You can connect a three-pin RGB header to a four-pin RGB header. However, you will not be able to control the full range of colors available with a four-pin header. Additionally, it is essential to note that motherboards require specific pin configurations for RGB to work.
Most motherboards have both 3-pin and 4-pin headers on them. There are few with only 4-pin headers. These motherboards are made explicitly for the RGB fans and mostly are the gaming motherboard. It would be best to connect a 3-pin to a 4-pin converter to use these 4-pin headers. .
How To Connect 3 PIN RGB To a 4 PIN Header?
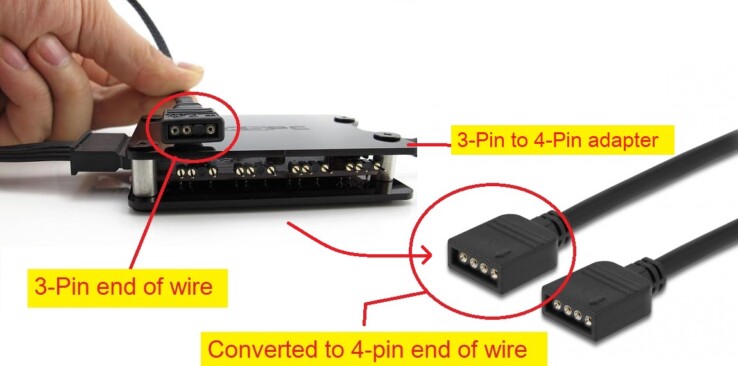
To connect a 3-pin RGB header to a 4-pin header, you must use an RGB adapter. It will allow you to connect the 3-pin jack to the fourth pin on the header. It is the easiest way to connect the header and provide the best connection for your RGB devices.
Here are the 4 ways & tips for you to do it. Each method has its benefits, so read on to find out which one is right for you:
4 Best Ways To Connect 3 PIN RGB To a 4-pin Header
1. By Using 3-Pin to 4-Pin Adapter:
There are a few different types of adapters available, but the most common is the 3-pin to 4-pin Adapter. These adapters are available in a wide range, from a multi-hub to a single adapter. If you want to connect multiple 3-Pin RGBs, you must use a multi-pin hub. These hubs are safe and reliable to use.
These hubs will allow you to plug your 3-pin RGB lights into a 4-pin header on your motherboard. Here is how you can set up a hub:
- First, you have to connect the Adapter or hub with the power source. Plugin the power cable of the Adapter into the power cable of the power supply.
- Connect the 3-pin heads of wire with the hub point.
- Now connect the other end with your 4-pin header.
Using these connections won’t change the current or voltage but will affect the control over RGB lights. One 4th head of RGB is always used to transfer data which allows you to control and customize your RGB through different software.
2. By Using Splitting Cables:
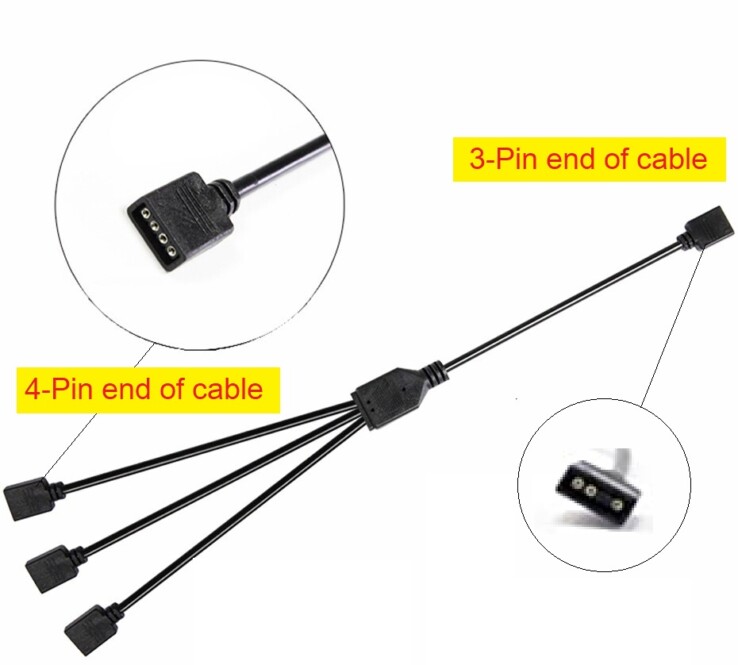
Another option is to use a splitter. It is essentially a 3-pin to a 4-pin wire cable that allows you to connect multiple 3-pin RGB lights to a single 4-pin header. This is a great option if you want to add more than one light to your system.
- Locate the 3-pin header on the motherboard of your computer.
- Plugin the 3-pin side of the splitting cable and connect the other 4-pin end with the fan or light.
- Now turn on your computer to ensure all the connections are correct.
3. By Using USB Controller:
If your motherboard does not have a 4-pin RGB header, you can use a USB controller. First, you will need to connect the 3-pin RGB header to the controller using jumper wires. Once that is done, you can connect the controller to an available USB port on your motherboard.
This is the best method if your motherboard lacks 3 Pin headers and an extra power cable. The hub will convert the 3-pins, and the USB will provide the power to the hub.
4. By Making Your Adapter:
If you are feeling confident, you can make your own Adapter using some jumper wires. It will require a d
- Cut three pieces of wire that are about 10 cm long.
- Remove each strip of ½ cm of insulation from each end of the wires.
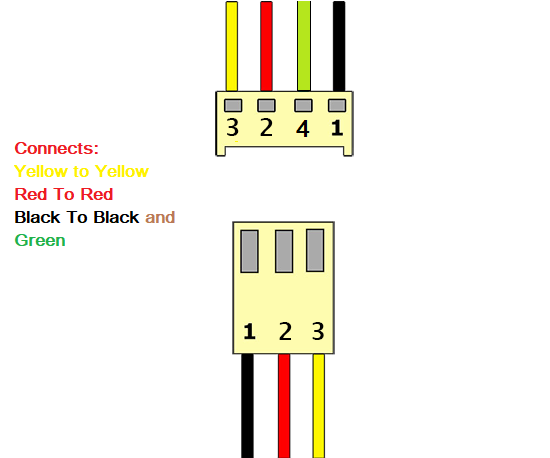
- Now, take the black wire and connect it to the ground (GND) pin on both the 3-pin and 4-pin headers.
- Next, connect the red wires to the +5V pin on both headers.
- Lastly, connect the yellow wire to the D- pin on both headers.
- You don’t need to connect the green wire of the 4-pin header, it is because is an extra ground wire in this case.
The biggest difference between a 3 and 4-pin header is that a 4-pin header has an extra ground connection. This extra ground connection can also be eliminated. This is often a green color wire. In the 4-pin header, it serves as a data wire but in the 3-pin header, it is an extra ground.
Is It Safe To Use 3 Pin RGB To a 4 Pin Header?
If you use a good quality converter or make your own Adapter using good quality jumper wires, then it is perfectly safe to use a 3-pin RGB header to connect to a 4-pin header. However, if you use a poor-quality converter or make your own Adapter using cheap jumper wires, then it might damage your motherboard.
The simple answer is yes, it is safe to connect a 3-pin RGB to a 4-pin header. Using converters and controllers is the best and safe way. However, there are a few things you need to keep in mind in order to ensure that everything works correctly and safely.
- Don’t use low-quality adapters, converters, or USB converters. They may damage your motherboard by causing overheating.
- Converters or controllers consume extra power from the motherboard or power supply, they may cause voltage shortages.
- Some motherboards don’t support multiple RGB connections. Using multiple 3-pin t 4-pin wires may damage their hardware.
Drawbacks of Using 3 PIN RGB to a 4 PIN Header
The main drawback of using a 3-pin header to connect to a 4-pin header is that you will not be able to control the speed and customize the RGB lights. The 4-pin header allows you to control the speed of the RGB lights, but the 3-pin header does not.
Another thing to keep in mind is that if you are using an RGB controller, then it might not work with a 3-pin header. So, if you want to use an RGB controller, make sure that it is compatible with a 3-pin header.
USB-based RGB hubs or controllers occupy one of your crucial USB slots. If you have limited slots, then the best option is to buy power supply supported RGB controllers or adapters.
Connecting multiple fans on a single header may cause overheating and damage your hardware. The connector attached to the fan and supply may overheat and cause damage.
The last and the most important point is the control over RGB. 4 pin headers allow complete control over RGB, whether it is light or fans. It means you can control color, sequence of colors, and fan speed in the case of RGB fans. The 3-pin RGB are basically 5v ARGBs that do not support such features.
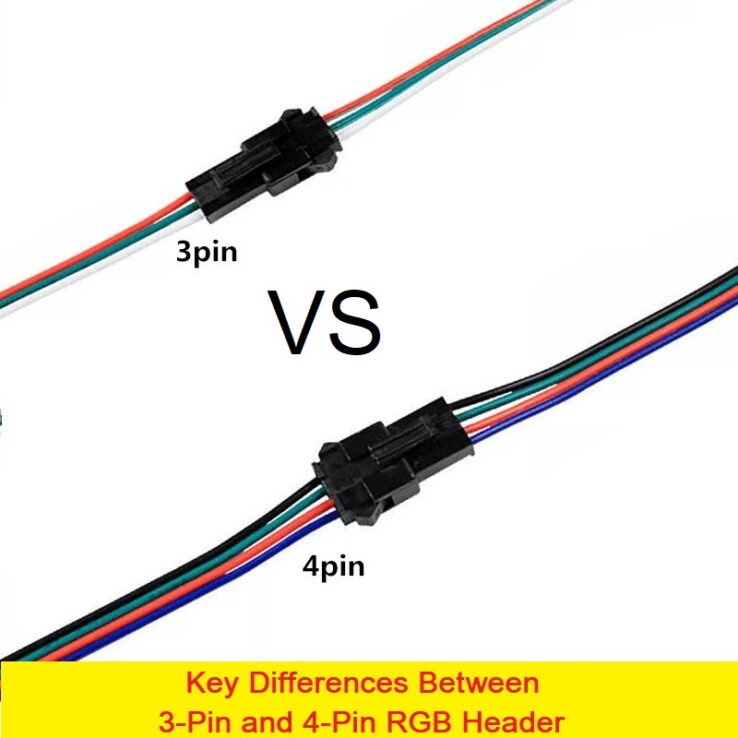
Key Differences Between 3-Pin and 4-Pin RGB Header:
The 3-pin and 4-pin RGB headers are different in terms of their pin configurations. The fourth pin is used for configuration and control of the color and fan speed in the case of 4-pin RGB headers, while the third pin is used for power supply in the case of 3-pin RGB headers.
Another difference is that a 3-pin RGB header can support up to four LED devices, while a 4-pin RGB header can support only two LED devices. This difference is because 3-pin RGB headers transfer power as well as data while 4-pin RGB headers just transfer data.
The other notable difference between 3-pin and 4-pin RGB headers is that the 4-pin supports digital control whereas the 3-pin doesn’t. This means that you can use software to control the color of an LED wired to a 4-pin header, but you can’t do so with an LED wired to a 3-pin header.
| 3-Pin RGB Header | 4-Pin RGB Header |
| The third pin only controls power. | The fourth pin is used to control data |
| It can support up to 3 multiple RGB devices. | It can support up to 4 multiple RGB devices. |
| You can’t configure color combinations or fan speed. | You can configure color combinations and fan speed using software. |
| It is 5v ARGB supported. | It is 12v RGB supported. |
So, if you’re looking to add some color to your PC, you’ll need to decide whether you want to use a 3-pin or 4-pin RGB header.
Final words
I hope these 4 Best methods will help you safely connect 3 PIN RGB to a 4 PIN header. All these methods, including Adapter and controller, are testified methods. Though there are some drawbacks, provided methods are safe. There are a few key differences between 3-pin and 4-pin header connectors that are important to know when selecting the right one for your application.
The number of pins is the most obvious difference, but there are also some slight variations in pin configuration and spacing that can make a big difference in how well the connector performs.

Hey, I’m Hammad. I write for this website to help you with the IT advice about PC, RAM, CPU, Motherboard, PSU, and other PC components.
I will provide detailed guides with images, and explain step by step so you can understand the process. Check all my articles here.


