
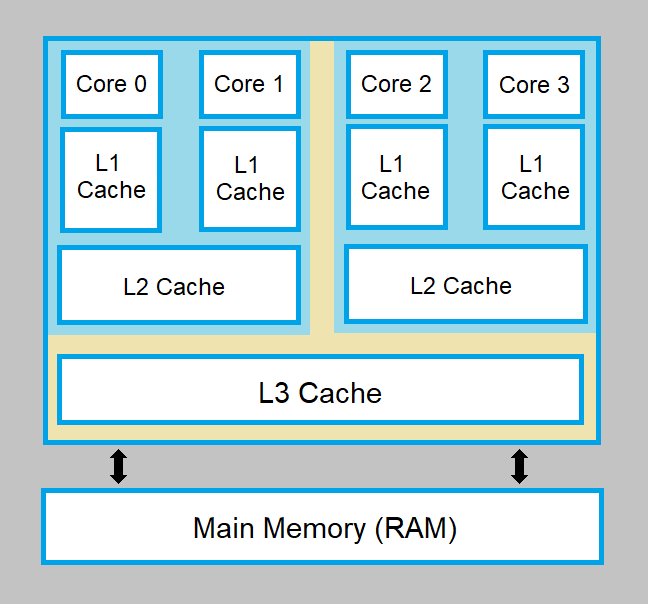
CPU stands for Central Processing Unit, and all modern computer processors have multiple cores.
The CPU is the brain of any computer system, and its cores are the basic processing units. Each core in a computer processor is capable of executing program instructions. All apps and games give some instruction code that only a CPU or a GPU can execute, depending on the nature of the software.
You may have a good CPU installed in your computer system, but you cannot use all its cores for maximum performance. This article discusses why you cannot use all your CPU cores. We will also discuss other aspects related to computer processors and their cores.
Why Can’t I Use All My CPU Cores?
You cannot use all your CPU cores because you have not enabled them. That is why your multicore and multi-threaded CPU executes all the apps and games on its single core. As a result, your computer’s performance degrades, and it executes processes slowly. It also wastes your time.
Allowing your CPU to execute all the software using a single core is very burdensome for your computer processor. In this case, its core can easily burn out by overheating after overloading. Installing a CPU cooler also does not work. The only solution is to enable all other cores through your OS.
If you are a Windows 10/11 OS user, you can easily enable this CPU feature so your apps and games can use all of its cores. It will allow your CPU to execute multiple threads simultaneously using multiple cores. As a result, your computer system’s performance and efficiency will boost.
How Can I Easily Use All My CPU Cores?
You can easily use all of your CPU cores by enabling them. It will allow your multi-threaded apps and games to use your multi-cored computer processor. The performance and efficiency of your computer system will also boost up, especially when your CPU operates on a high frequency.
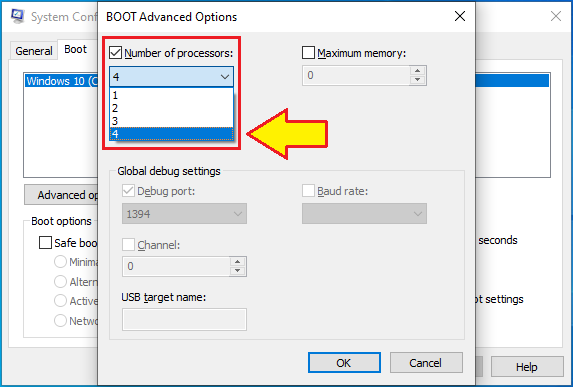
You must follow these simple and easy steps on your windows operating system to enable all of your CPU cores. First, open the “Start Menu” and type “System Configuration” using your computer keyboard. An application will appear with the same name that you have typed.
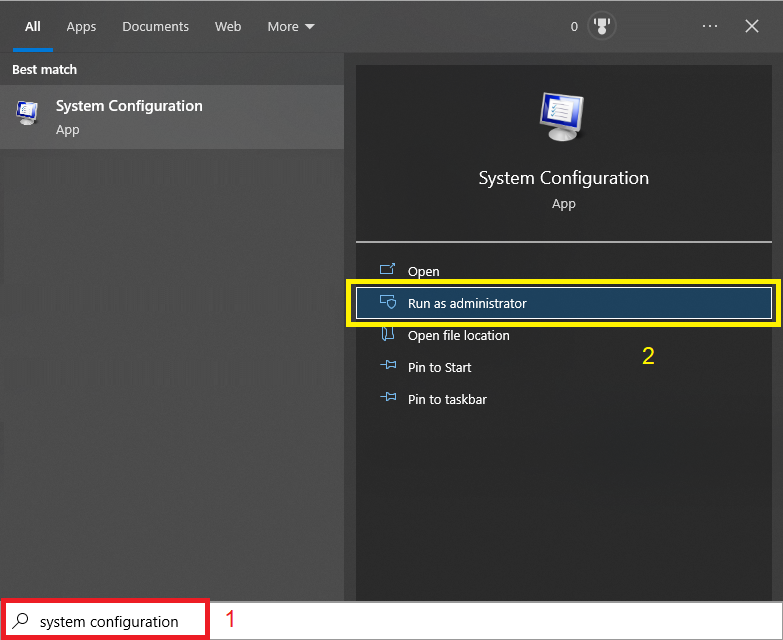
Next, you must run the app by selecting “Run as administrator.” Now a small window will appear with multiple tabs where you need to select the tab named “Boot.” You must click the “Advanced Option” button to enable all your CPU cores and its multithreading execution feature.
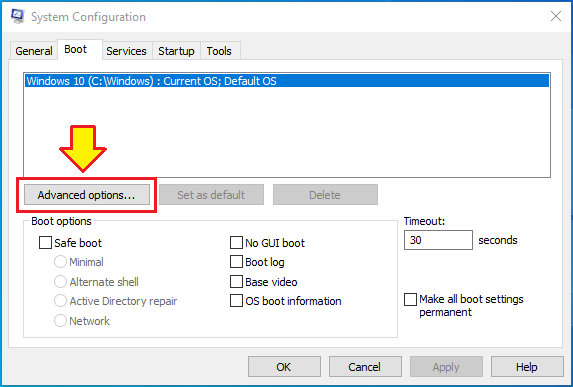
After pressing this button, another small window will appear where you must select the checkbox saying “Number of Processors.” The term “Processors” is used for the term “Cores” here. In the end, select the maximum number of cores, such as 4, 6, or 12, so you can use them simultaneously.
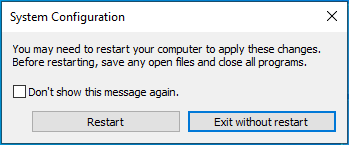
Now you need to restart your computer system as soon as possible. Ensure you have saved all the progress that can be lost on restarting your PC or laptop. The restart is crucial; without it, none of the other cores will be enabled. As a result, the single core will keep overloading.
After the reboot, you will notice that your computer system has become faster. It is because all its CPU cores now work together to execute your apps and games simultaneously. The speed of your CPU processing will also increase because all the computer processor cores use the same frequency.
How To Check If I Am Using All My CPU Cores Or Not?
It is essential to check if all of your CPU cores are working because you will not be satisfied without them. It is also necessary to check, especially when opening multiple apps and games simultaneously. You can follow this easy procedure to check if all of your CPU cores are.
To check if you are using all of your CPU cores, right-click on the “Taskbar” and select the option “Task Manager.” After this, an app with multiple tabs will open. Now, you need to select the tab named “Performance.” This tab contains all the stats about your main hardware.
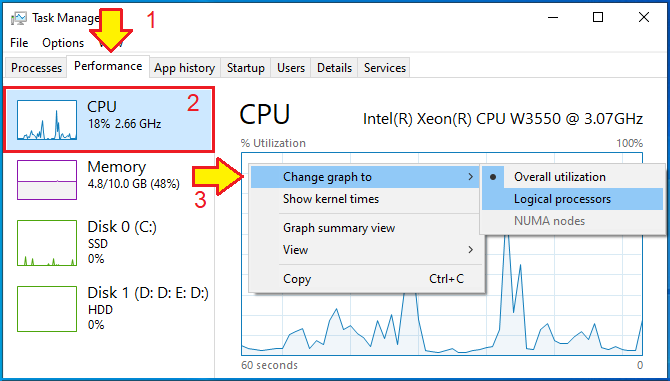
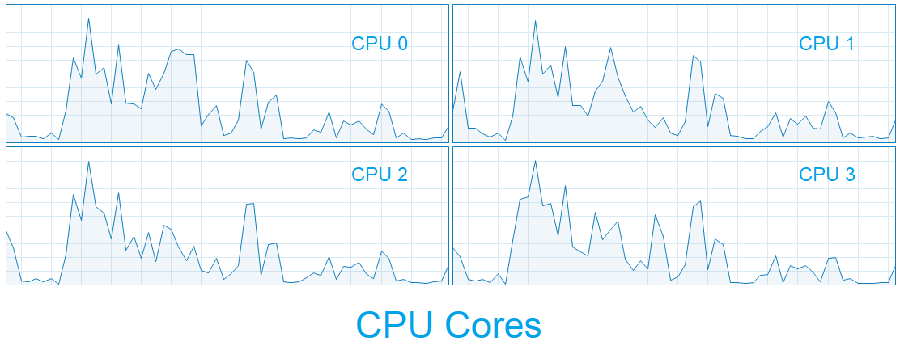
Here you will see this hardware on the left-hand side of the GUI (graphical user interface) of the “Task Manager” app. Just select the option “CPU” from this list. Right-click on the graph on your right-hand side of the user interface (UI) and first select “Change graph to” then “Logical Processes.”
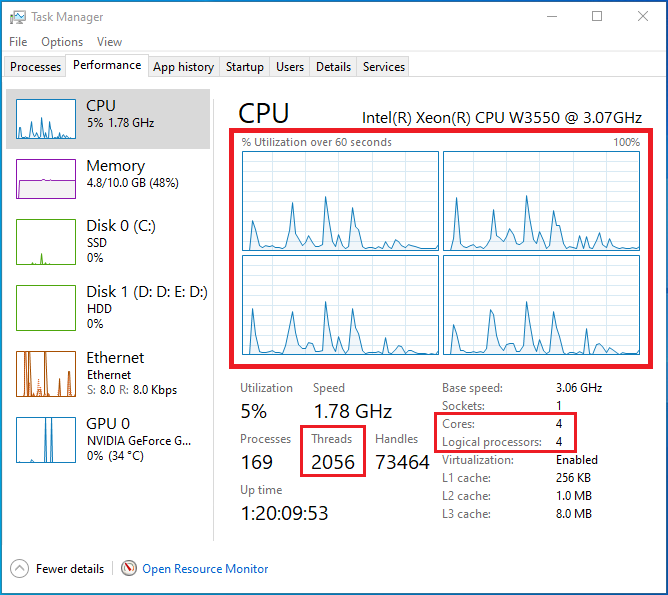
After doing this, the single graph will split into as many graphs as your CPU cores. Here you will be able to see if you are using all of your CPU cores or not. You will also be able to check the total number of threads your CPU is currently executing using its cores.
Should I Enable All My CPU Cores in Windows 10/11?
There are multiple advantages of enabling all your CPU cores in the Windows operating system. Let’s discuss each advantage one by one in some detail:
1. Increased Throughput
Enabling all your CPU cores increases the throughput of your computer processor. Throughput is the number of processes a CPU can execute within the given time frame. Two main factors increase CPU throughput. Its operating speed is gigahertz (GHz), and its number of cores.
If both factors are high, the throughput of a CPU will also be high. But the condition is that all CPU cores must be enabled in Windows 10/11. We know that each core is capable of executing a process. So all cores will simultaneously execute multiple program instructions as a team.
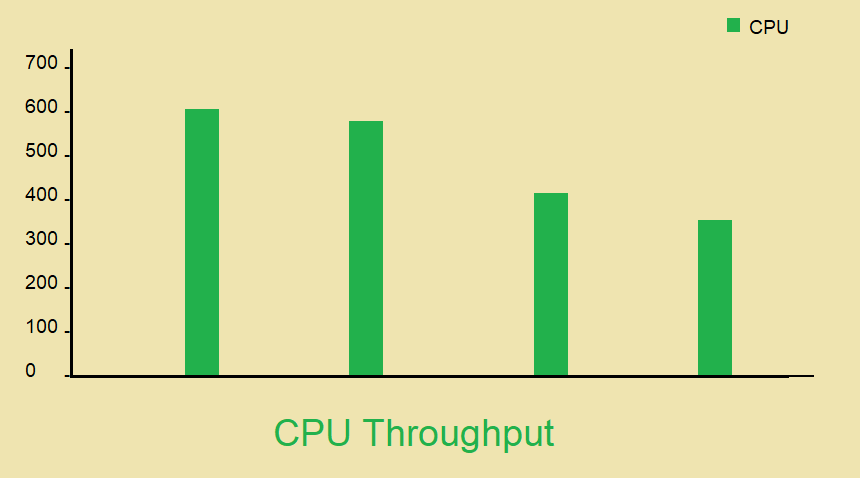
The advantage of increased throughput is that your computer system becomes faster because your CPU’s execution speed increases. It is because enabling all cores forces them to work simultaneously at the same frequency. The other credits go to the pipelining process and the size of the registers.
2. Parallel Multithreading
Enabling all your CPU cores in Windows 10/11 allows you to take advantage of parallel multithreading. In the past, apps and games were heavy processes. But nowadays, they have become lightweight entities which are known as threads. Simply, now threads make a process, app, game, etc.
In other words, all of the latest software is called multi-threaded software. The cores in a CPU are created to execute the threads efficiently. And enabling CPU cores allows the cores to execute multiple threads simultaneously. Those threads can either be of the same app or different apps.
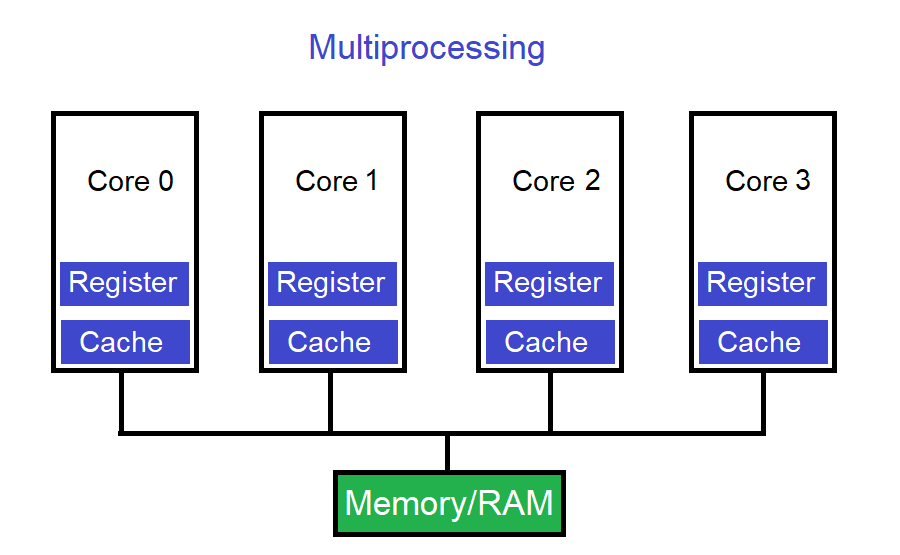
3. Faster Multiprocessing
Enabling all your CPU cores in Windows 10/11 allows your computer processor to do faster multiprocessing. Multiprocessing is a method of executing multiple processes simultaneously. By process, we mean apps and games. Nearly all computer systems have the feature of multiprocessing.
Each core in a CPU is capable of executing a thread or a program instruction independently. Hence, multiprocessing becomes faster when multiple cores execute threads and program instructions. Its speed increases when your CPU can operate on a higher frequency range.
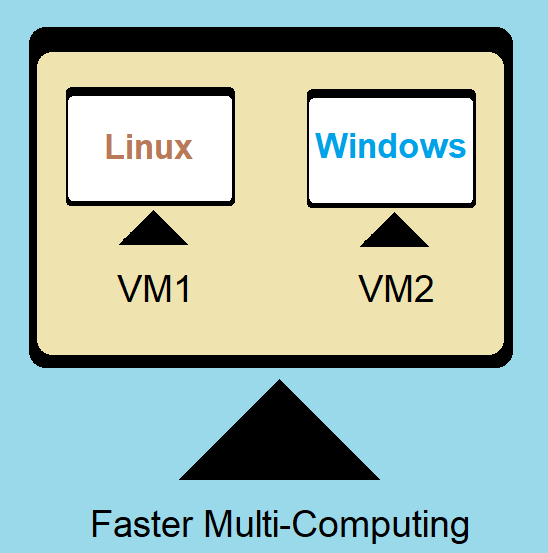
4. Faster Multi-Computing
Enabling all your CPU cores allows faster multi-computing. Multi-computing is implemented by enabling CPU Virtualization and installing multiple virtual machines (VMs) simultaneously. Each virtual machine has an operating system that works like a separate computer.
The only thing that is common among virtual machines is your computer CPU. A processor with more cores handles and executes more processes (apps and games) simultaneously. This phenomenon is also known as multi-computing. The only hardware that you need to upgrade is the memory modules.
Is It OK to Enable All CPU Cores?
Yes, it is OK to enable all CPU cores because it is different from enabling overclocking. Enabling all computer processor cores will allow your CPU to execute all your apps simultaneously using the same high speed as your computer processor. In contrast, overclocking increases processing speed.
Nearly all modern CPUs have multiple cores to execute multiple threads simultaneously. When installing a new operating system, you must enable them manually. Otherwise, your CPU executes all your software using a single core, and the others become idle and useless.
For example, if you have a six-core CPU and have not enabled all its cores. Then you will use only one core, and all other cores will be idle and useless. It will decrease the throughput of your computer processor, and your PC or laptop will become slow. Hence, you should enable them.
Enabling your CPU cores will allow your CPU to execute your multi-threaded apps and games efficiently. It will increase the throughput of your CPU. Throughput is measured by the number of processes your computer processor can execute within a given time.
If your CPU has a high frequency, such as 3.0 GHz, and all of its cores are enabled, then you will increase the performance and efficiency of your PC or laptop. The throughput of your computer processor will also increase. It is because all your CPU cores will work on the same frequency.
On the other hand, CPU overclocking increases CPU speed. It is a built-in function in most processors. The latest motherboards allow you to do this using software or the UEFI/BIOS. An advanced cooling system is a must for enabling CPU overclocking.
Conclusion
You cannot use all your CPU cores because they are disabled by default. It happens when you install a new operating system, such as Windows 10/11. To use all your CPU cores properly, you will have to enable them first. You can easily do this only by following a simple and easy procedure.
To use all your CPU cores, open the “System Configuration” app as an administrator. Then go to its tab named “Boot.” Now press the button saying “Advanced Options.” Check the “Number of processors” checkbox and select the maximum number of your CPU cores to enable and use them simultaneously.
Finally, press the “Apply” button to save the changes and then the “OK” button. It will not be effective until you restart your computer. Make sure to save your progress before rebooting your PC or laptop. You can restart either manually or by pressing the “Restart” button on the UI.
Enabling the use of all your CPU cores increases the throughput of your computer processor. Simply put, you allow your CPU to execute more program instructions in the given time frame. It also allows you to take advantage of multithreading properly. Nearly all games and apps are multi-threaded.
Using all your CPU cores allows you dramatically faster multiprocessing. Simply put, it speeds up the execution and calculation of a processor. You can make it even faster by upgrading a CPU with more cores and operating speed. It also speeds up multi-computing when you install virtual machines.

Hey, I’m Hammad. I write for this website to help you with the IT advice about PC, RAM, CPU, Motherboard, PSU, and other PC components.
I will provide detailed guides with images, and explain step by step so you can understand the process. Check all my articles here.